It's Friday afternoon, and you're ready to push your latest game update to Steam. But first, you need to export builds for Windows, Linux, and macOS. Each export takes time, and halfway through the Android build, you realize your local SDK is out of date. Now you're starting over, manually managing multiple builds, and your weekend release is looking like a Monday release.
This scenario plays out in game studios everywhere. While we have incredible tools for creating games like Blender for 3D modeling, Godot for development, and Steam for distribution, the bridge between finished game and game in players' hands remains frustratingly manual and very error-prone.
The solution lies in treating game development for what it really is: software development. That means we can borrow decades of proven practices from the software world, specifically Continuous Integration and Continuous Delivery CI/CD.
This raises a few key questions. How do we use these practices to deliver better games? How can we move faster without sacrificing quality? How do we share our work more easily with the communities that support our game?
What Is CI/CD?
Continuous Integration, or CI, is a practice that became common in the 1990s alongside agile methodologies. At that time, many projects suffered from what can be called “integration hell”. Teams would develop large pieces of code separately and then struggle to merge them. Continuous Integration solves this by encouraging smaller and more frequent updates. Every change is integrated and built automatically. Errors are caught earlier, collaboration is smoother, and the project as a whole remains stable.
CI also encourages engineers and product owners to think in smaller steps. Features are designed in chunks that can be implemented and tested quickly. Each step is easier to manage, but when combined, they form the complete product.
CD stands for Continuous Delivery. This means that every change that passes the integration stage goes through a defined sequence of steps, so there is always a production-ready build available.
For game developers, this is especially valuable. Exporting a game often requires external tools, SDKs, and libraries. If each team member had to maintain this environment locally, it would quickly become unmanageable. With Continuous Delivery, the release process runs in a single controlled environment. The result is a sequence of steps that is safe, repeatable, and consistent across every build.
Why CI/CD Matters for Game Development
Game development is not only about adding fun gameplay. That is a crucial part, but many other aspects determine the success of a project. Developers need to decide which stores will provide the best results for publishing and distribution. They need ways to reach their communities quickly to gather feedback. Teams must integrate constant changes into a single stable release. Projects need to stay compatible with the latest version of the engine. And every game has to be built for a variety of operating systems.
This is where CI/CD becomes an invaluable tool. A well-designed pipeline removes pressure from the team by automating the most complex steps. With a single configuration, you can set up an environment that includes the required libraries, the game engine, and the export presets. From there, builds can be deployed to multiple stores and platforms without repeating the work manually. Frequent, reliable updates not only make the release process smoother, but they also show the community that the project is active, which encourages feedback and engagement.
Bringing It All Together with W4 Build
Let's explore how to put these ideas into practice. W4 Build is a CI/CD platform designed specifically for Godot developers. It has two main functionalities: the Godot pipeline for compiling custom engine builds and the Game pipeline for exporting your projects, with additional tools supporting these core functionalities like webhooks, Git repository integrations, and deployment options.
This guide is designed for Godot developers who want to streamline their release process, whether you're working solo or in a team. You'll get the most value if you already have a Godot project ready to build and distribute, plan to release on multiple platforms (Windows, Linux, macOS, or mobile), and have basic Git experience with concepts like repositories, branches, and commits.
It's also useful if you're starting a new project and want to iterate quickly. Setting up automated builds from day one means you can share early prototypes with testers and get feedback faster.
Many general-purpose tools can achieve similar results. For example, you could create a custom pipeline with GitHub Actions or GitLab CI. But building and maintaining that setup requires significant effort from your team, as well as additional costs if you want advanced features such as PCK encryption. Even something as basic as compiling Godot within GitHub Actions often demands paid runners to get acceptable performance.
In this blog post, we will explore how to use W4 Build to automate your Godot workflows and remove these barriers by learning how to:
- Connect your project through GitHub integration (or GitLab, or any service that supports OAuth tokens)
- Configure build matrices to generate exports rapidly for multiple platforms, including Linux, Windows, macOS, Web, and Android
- Deploy your game directly to Steam
A video containing similar content to this blog post can be found here:
Building a W4 Build Pipeline
Let's start building a full CI pipeline in W4build. Each step in the following sections has a supportive chapter on the product documentation, which can be found here https://build.w4.gd/
Setting up a CI/CD pipeline in W4 Build takes three steps:
- Connect your repository with OAuth or SSH keys. We recommend OAuth for a faster setup.
- Configure your build matrix to define what versions and platforms to build.
- Add deployment targets so W4 Build knows where to publish your artifacts, such as Steam or itch.io.
With this in place, every change you push will produce consistent builds and publish them automatically.
Github Oauth integration
W4 Build makes it simple to connect with GitHub and GitLab. The GitHub integration is more complete, since the platform provides features such as automatic webhook configuration when you install the GitHub application. With GitLab, webhooks need to be configured manually
We have a full video guide on integrating with GitHub or GitLab here:
To integrate with GitHub, follow these steps:
- Open your project page on the W4 Build dashboard.
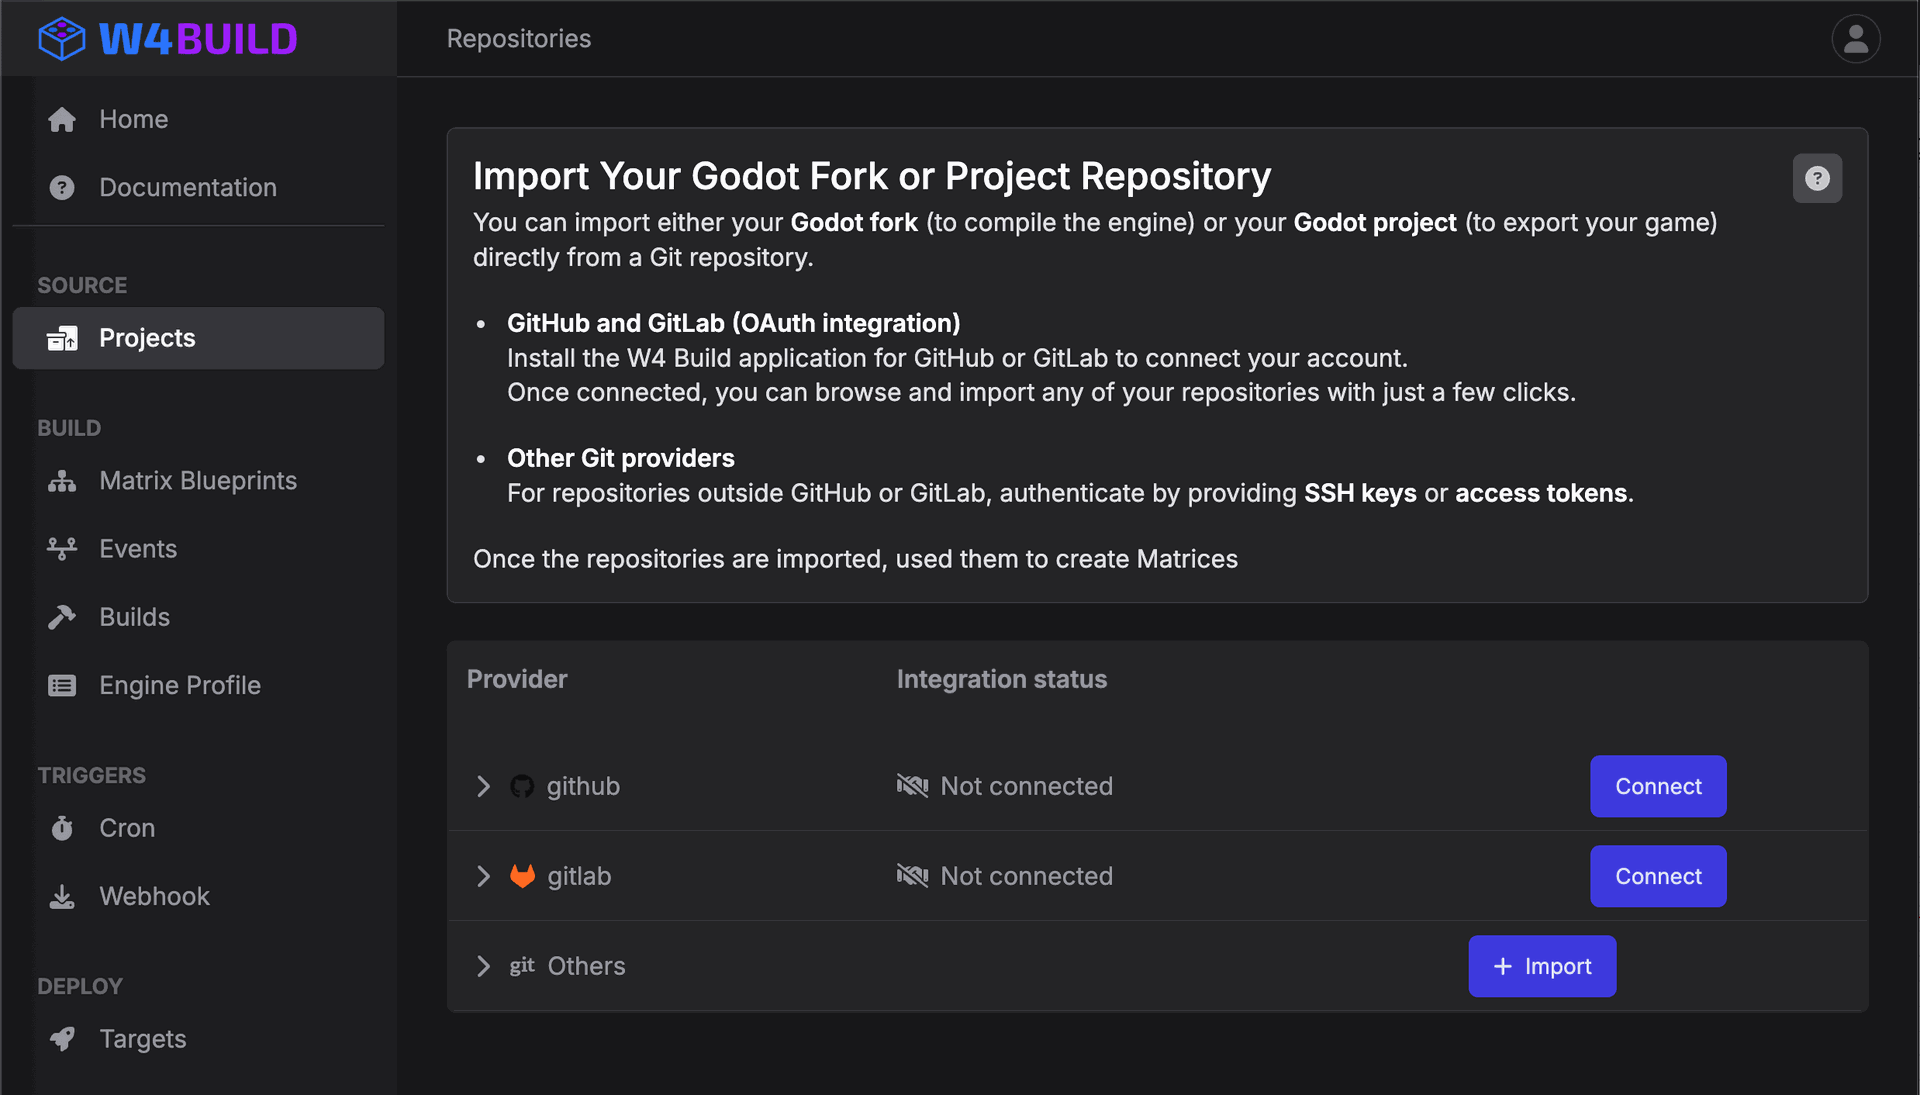
- Click Connect on the GitHub row. This redirects you to install the W4 Build GitHub application.
- Select only the repositories that contain your Godot project or custom engine fork.
- Click Install and Authorize.
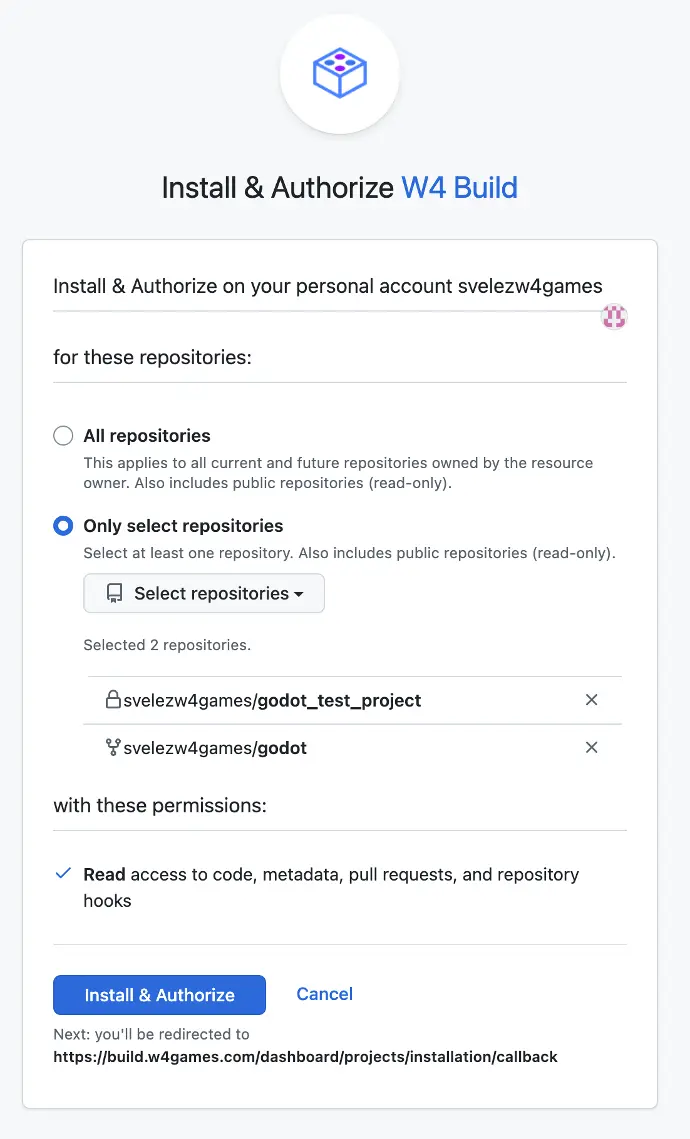
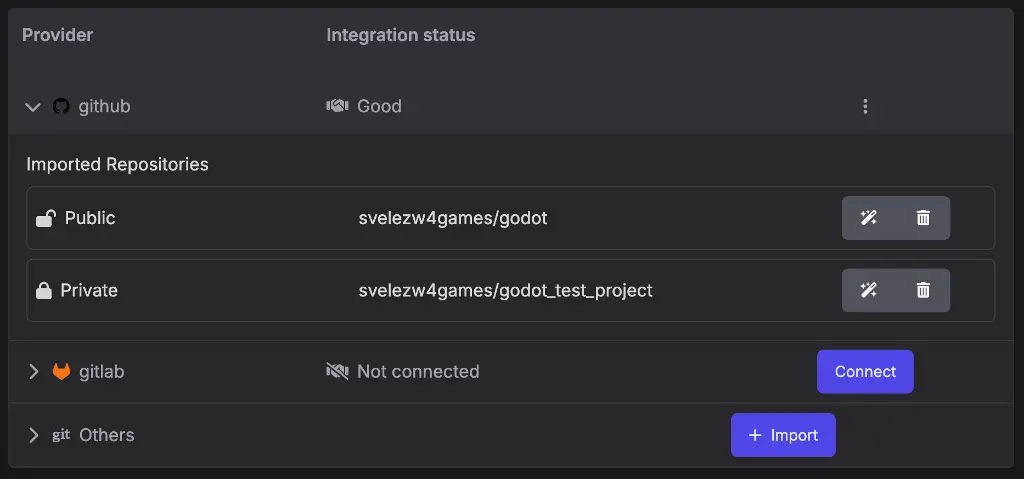
Once completed, you will be redirected back to W4 Build. The dashboard will confirm that access has been granted, and your selected repositories will now be available for building.
Configuring your matrix
Most games are exported to multiple platforms. For example, if you plan to publish on Steam, you will usually need at least two builds: one for Windows (the most common OS for players) and another for Linux, since the Steam Deck runs on a Linux distribution.
This is where matrices are useful. A matrix groups builds that share common settings, such as repository and Godot engine Version, while allowing differences in platform or export target.
Before continuing, make sure you have already configured your export presets by following the official Godot documentation here:
Creating a Matrix
1. On the repository that contains your game, click the wand icon

2. In the pop-up window, confirm that the selected repository contains your game code
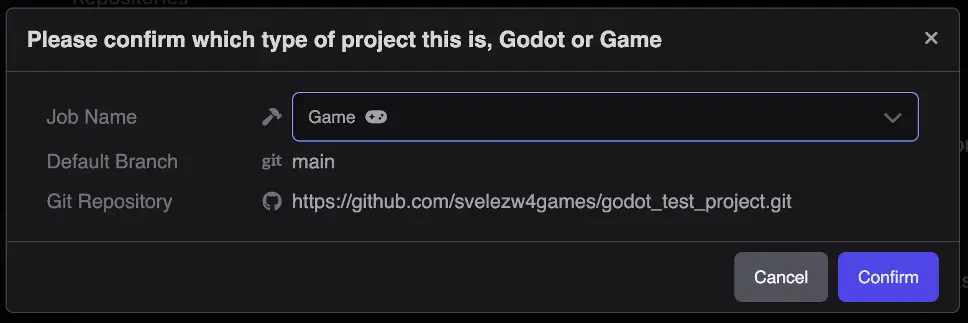
3. Click confirm.
Configuring Common Variables
1. Click the cog icon to edit common settings.

2. Select the Godot version your project uses. For example, here we select the official stable release 4.4.1.
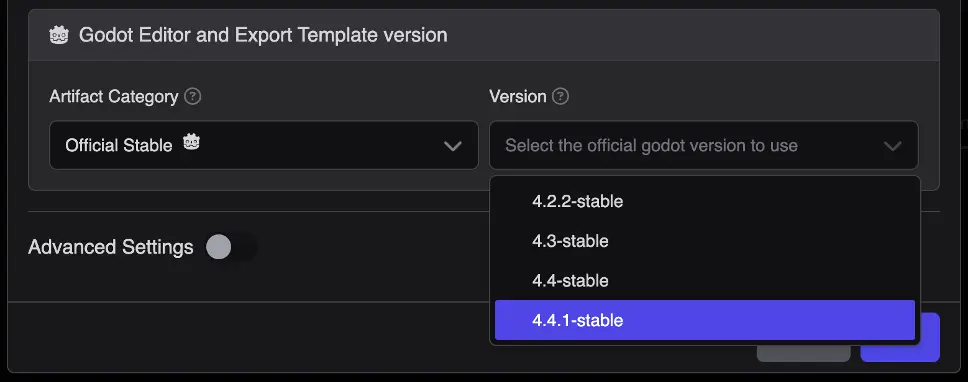
3. Click Save.
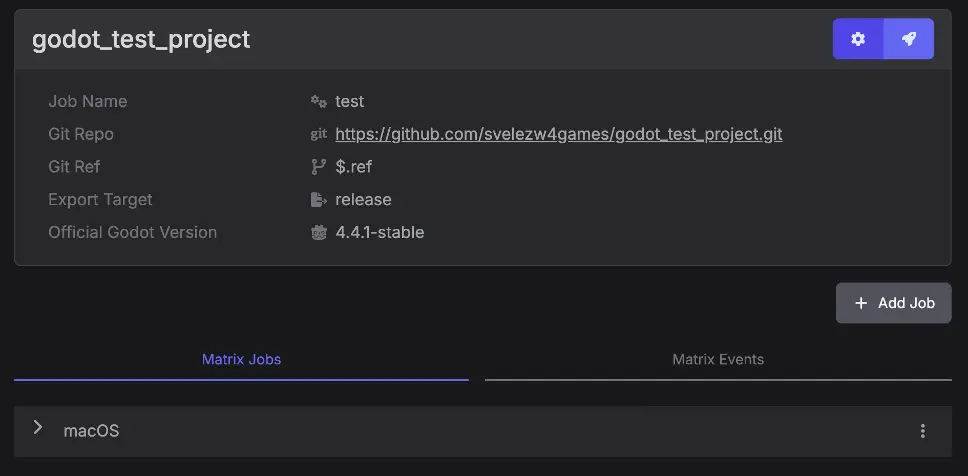
At this point the matrix has all common variables set, and you can now add builds for each export preset in your project. Presets are defined in the export_presets.cfg file located at the root of your game project. You can see an example file here:
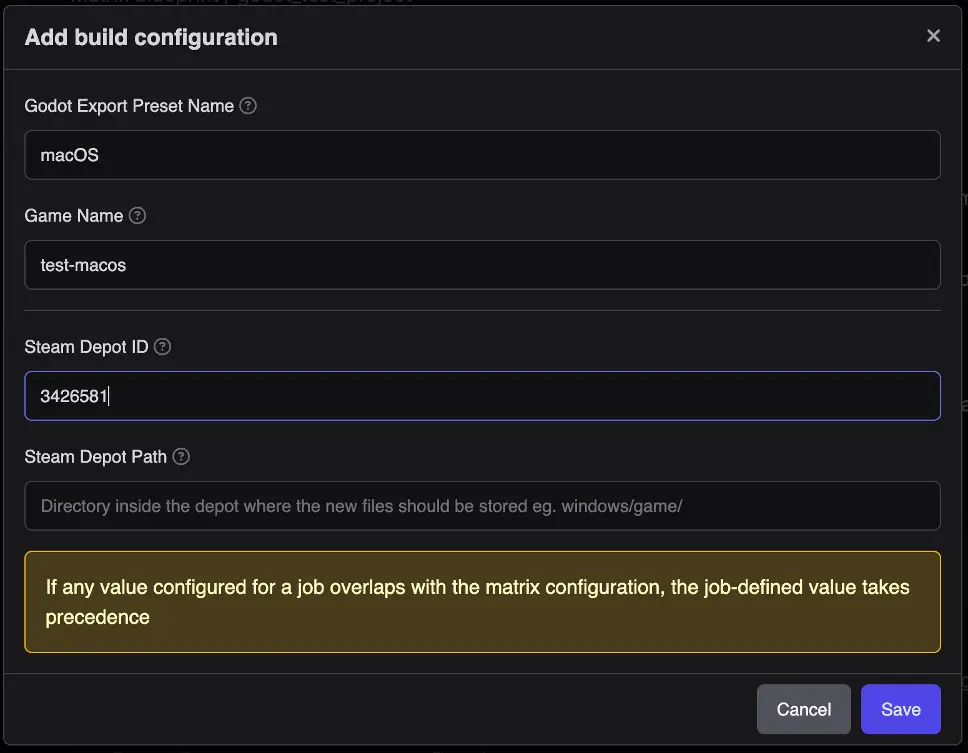
Adding Builds
1. Click + Add Job.
2. In Preset Name, enter the name of the export preset.
2. In Game Name, set how the executable file will be named.
4. If deploying to Steam, add the Steam Depot ID in the corresponding field. Documentation on Steam depots is available here
Your form should now look similar to this:
Steam Deployment Configuration
The final step is telling W4 Build where to send your game files after each build. Once a build finishes, W4 Build stores the generated artifacts (for example, a .zip file with your macOS export). Deployments are triggered whenever new files are stored, so you can automatically push them to Steam.
One of the biggest advantages of having Steam deployment in a reproducible CI/CD environment is stability. Game distribution platforms can occasionally experience slowdowns or interruptions, especially during high-traffic periods such as major releases. If you rely on manual uploads, these disruptions may force you to restart the process from scratch.
With W4 Build, your deployment pipeline is automated and reproducible. You can easily retry as many times as you need.
Prerequisites
Before configuring Steam deployment, make sure you have:
- Steamworks Account: Create an account here https://partner.steamgames.com/
- Steamworks App: Create a Steamworks App here https://partner.steamgames.com/doc/store/application
- Steamworks Depots: Create Steamworks Depots here https://partner.steamgames.com/doc/store/application/depots
Best practices:
- Create a dedicated Steamworks account for W4 Build deployments.
- Use email codes instead of the Steam Guard mobile app.
- Do not deploy directly to the default branch. Create and use a separate branch for testing.
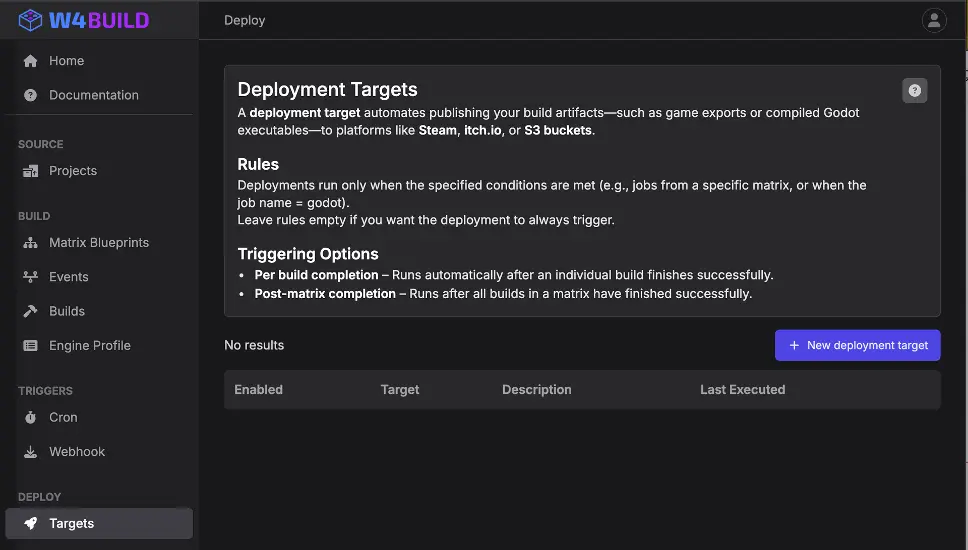
Adding a Steam Deployment
- Go to Deployments → Targets.
On the new pop up window
- Click Add New Deployment Target.
- Select Steam
- Add a short description
- Click Save

Configuring Steam Credentials
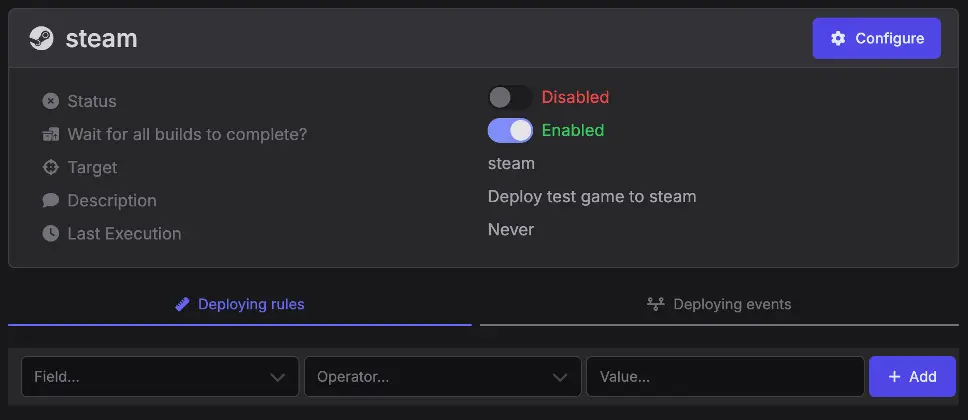
At this stage, your deployment target will appear but remain disabled.
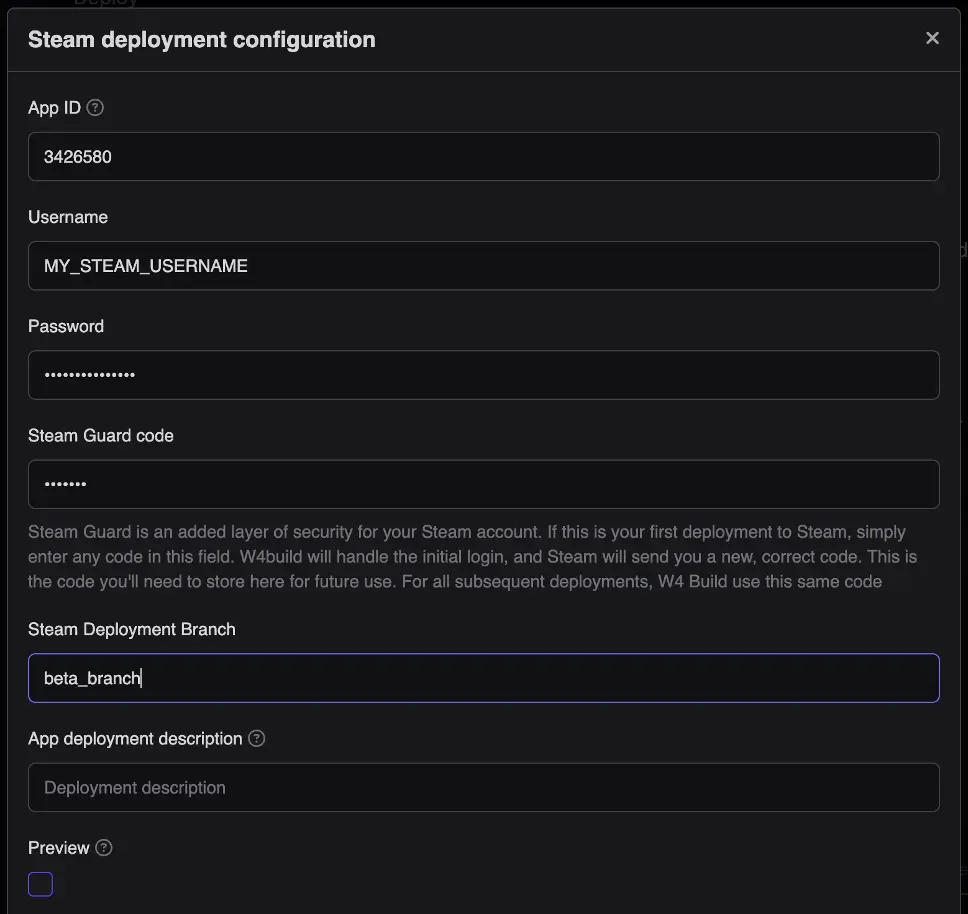
Click Configure on your Steam deployment and fill out the following fields:
Each field is:
App ID:
The app ID is the numeric value that identifies your app. This can be obtained after creating the app on Steam. Visit the app list on Steam on https://partner.steamgames.com/apps/
Username: Steam
SteamWorks username, same as the one used to log in to Steamworks
Password:
SteamWorks password, same as the one used to log in to Steamworks
Steam Guard code:
When deploying to Steam for the first time, Steam requires an additional security step called Steam Guard. After you run your first deployment (and fail), Steam will send you an alphanumeric Steam Guard code by email.
Once you receive the code, copy it from your email and paste it into this field. After you enter the Steam Guard code once, W4 Build will reuse it automatically for future deployments.
Branch:
This is the Steaworks branch; if you are running the deployment for the first time. Deploy it to the default and then create a separate branch. More information about Steam branches can be found on Steam Branches https://partner.steamgames.com/doc/store/application/branches#1
Preview:
Preview Mode lets you test your Steam deployment without actually publishing it. It simulates a real Steam upload to ensure everything is working correctly.
Use Preview Mode while developing and testing your build pipeline. When you’re ready to deploy for real, simply disable Preview Mode.
Your form should look like this
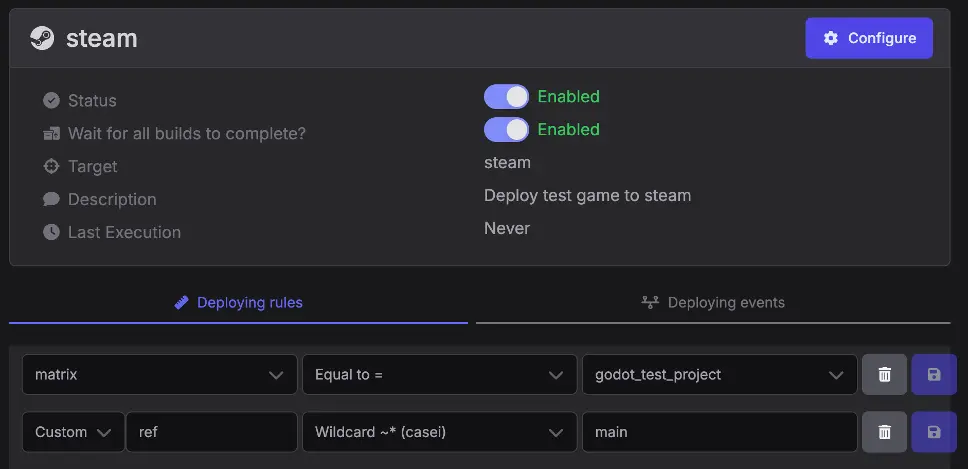
Adding Rules for Deployment
You can control when and where your Steam deployment triggers using rules. For example:
Matrix Rule → Only deploy artifacts from a specific matrix.
Branch Rule → Only deploy when the build comes from the main branch.
If you add multiple rules, W4 Build evaluates them with AND logic (all must match).
1. Rule to only use files of a given matrix
 2.
Rule to only execute when the build is from the main branch
2.
Rule to only execute when the build is from the main branch

Once rules are in place and credentials are configured, simply enable your deployment. From now on, every successful build that matches your rules will automatically upload to Steam.
Trigger you Matrix
The last step is to run your pipeline and see everything in action.
- Go to the Matrix page.
- Select the matrix you just created.
- Click the rocket button to launch your build.
Your game will now be compiled, exported to the platforms you configured, and deployed to the targets you set up. With just one click, W4 Build takes care of the entire process and delivers a reproducible, automated pipeline for your Godot game.
Wrapping Up
With your W4 Build pipeline now in place, you have transformed what used to be a manual, and possibly error-prone process into something automatic and reliable. Every commit you push will trigger builds across all your target platforms and deploy successful builds directly to Steam. No more manual exports, and no more worrying about whether your builds will work on different platforms.
More importantly, you can now focus on what matters most: making great games. Your pipeline handles the technical complexity of multi-platform releases while you concentrate on gameplay, art, and connecting with your community.